Howto build in Linux
If Armadillo is installed using a package manager or if it is installed using a wrapper you may build (for a program prog.cpp) using:
g++ prog.cpp -std=c++11 -I<sigpack_dir> -larmadillo -o prog
otherwise if you dont want to use the wrapper:
Vanilla BLAS/Lapack
g++ prog.cpp -std=c++11 -DARMA_DONT_USE_WRAPPER -I<sigpack_dir> -I<armadillo_dir> -lblas -llapack -o prog
OpenBLAS
g++ prog.cpp -std=c++11 -DARMA_DONT_USE_WRAPPER -I<sigpack_dir> -I<armadillo_dir> -lopenblas -o prog
Intel MKL
g++ prog.cpp -std=c++11 -DARMA_DONT_USE_WRAPPER -I<sigpack_dir> -I<armadillo_dir> -DARMA_USE_MKL_ALLOC `pkg-config --cflags --libs mkl-dynamic-lp64-seq` -o prog
FFTW3 support
If you use FFTW3 library, add the following parameters
An example of a Makefile may be
CXX = g++
CXX_FLAGS = -Wall -ggdb -std=c++11 -DHAVE_FFTW -I<sigpack_dir> -larmadillo -lfftw3
%: %.cpp
@echo '+++++++++++++++++++++++++++++++++++++++++++++'
@echo 'Compiling $<, making target ./$@ ...'
@echo '+++++++++++++++++++++++++++++++++++++++++++++'
$(CXX) $< $(CXX_FLAGS) -o $@
A simple example using SigPack is
{
arma::vec b;
std::cout << "Filter coeffs: \n" << b.t() << std::endl;
return 1;
}
Build it using make <source filename without ext>
Howto build in Windows
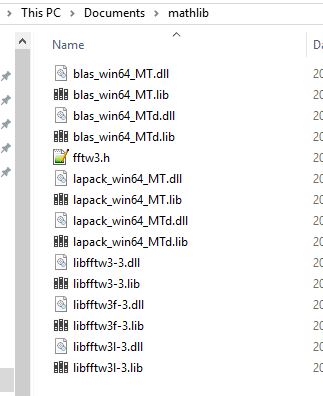
For Windows Visual Studio users, follow the instructions at FFTW. Copy fftw3.h and the three .dll and .lib files to the same directory as your other LAPACK and BLAS library was installed and make sure the environment paths are setup correctly.
Define HAVE_FFTW when you compile. Add the directory paths
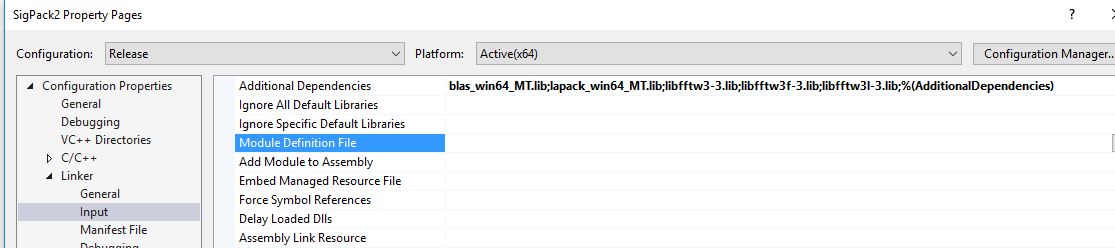
Add the following to the linker dependencies
Debugging
Debugging with Visual Studio
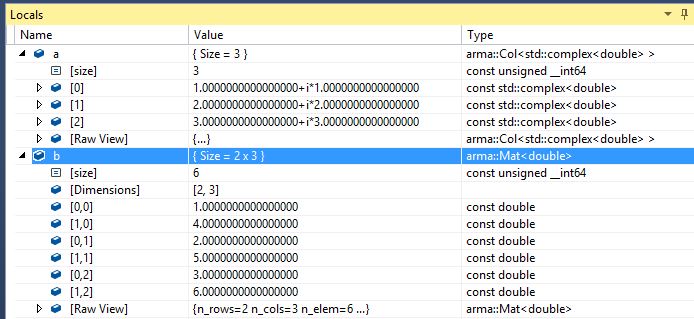
A nice feature in Visual Studio is the visualizers. Here is an example of Armadillo support in the debugger.
To accomplish this you need to copy the code below to your Visual Studio directory e.g ..\Documents\Visual Studio 2019\Visualizers\arma.natvis
<?xml version="1.0" encoding="utf-8"?>
<AutoVisualizer xmlns="http://schemas.microsoft.com/vstudio/debugger/natvis/2010">
<Type Name="arma::Col<*>">
<DisplayString>{{ Size = {n_elem} }}</DisplayString>
<Expand>
<Item Name="[size]">n_elem</Item>
<ArrayItems>
<Size>n_elem </Size>
<ValuePointer>mem</ValuePointer>
</ArrayItems>
</Expand>
</Type>
<Type Name="arma::Mat<*>">
<DisplayString>{{ Size = {n_rows} x {n_cols} }}</DisplayString>
<Expand>
<Item Name="[size]">n_elem</Item>
<ArrayItems>
<Direction>Backward</Direction>
<Rank>2</Rank>
<Size>($i*(int)n_cols+(1-$i)*(int)n_rows)</Size>
<ValuePointer>mem</ValuePointer>
</ArrayItems>
</Expand>
</Type>
</AutoVisualizer>
Debugging with GDB
In GDB (ver. 7 and above) it is possible to customize a python pretty printer to get a nice output when printing a variable. When printing a variable e.g. mat A={{1,2,3},{4,5,6}} in GDB the ordinary way it may look like:
> print A
$1 = {
<arma::Base<double, arma::Mat<double> >> = {
<arma::Base_inv_yes<arma::Mat<double> >> = {<No data fields>},
<arma::Base_eval_Mat<double, arma::Mat<double> >> = {<No data fields>},
<arma::Base_trans_default<arma::Mat<double> >> = {<No data fields>}, <No data fields>},
members of arma::Mat<double>:
n_rows = 2,
n_cols = 3,
n_elem = 6,
vec_state = 0,
mem_state = 0,
mem = 0x7fffffffe300,
mem_local = {[0] = 1, [1] = 4, [2] = 2, [3] = 5, [4] = 3, [5] = 6, [6] = 6.9533490615306639e-310, [7] = 6.9533490637108768e-310, [8] = 5.4110892669910883e-312, [9] = 6.9533490639353802e-310, [10] = 6.9533490637899273e-310, [11] = 6.9533490639622574e-310, [12] = 6.9533490637108768e-310, [13] = 3.0530525041307178e-31, [14] = 6.9533490637709552e-310, [15] = 6.9533490637994133e-310},
static is_col = false,
static is_row = false
}
With a pretty printer it looks like:
> print A
$1 = ARMA Matrix[2 x 3] = {
[0,0] = 1,
[1,0] = 4,
[0,1] = 2,
[1,1] = 5,
[0,2] = 3,
[1,2] = 6
}
To enable this feature you need to set your ~/.gdbinit file to
set print pretty on
set print array off
set print array-indexes on
source <path to your pretty printer>/arma_printer.py
and the pretty printer file arma_printer.py is
class VecPrinter:
class _iterator(object):
def __init__ (self, start, n):
self.ptr = start
self.len = n
self.cnt = 0
def __iter__(self):
return self
def __next__(self):
if self.cnt == self.len:
raise StopIteration
count = self.cnt
crt= self.ptr + count
elem = crt.dereference()
self.cnt = self.cnt + 1
return ('[%d]' % count, elem)
def __init__(self, val):
self.val = val
def children(self):
return self._iterator(self.val['mem'], self.val['n_elem'])
def to_string(self):
n = self.val['n_elem']
return ('ARMA Vector[%d]' % ( n ) )
class MatPrinter:
class _iterator(object):
def __init__ (self, start, r, c):
self.ptr = start
self.len = r*c
self.rows = r
self.cols = c
self.cnt = 0
def __iter__(self):
return self
def __next__(self):
if self.cnt == self.len:
raise StopIteration
count = self.cnt
crt= self.ptr + count
elem = crt.dereference()
self.cnt = self.cnt + 1
cols = (count//self.rows) % self.cols
rows = count % self.rows
return ('[%d,%d]' % (rows,cols), elem)
def __init__(self, val):
self.val = val
def children(self):
return self._iterator(self.val['mem'], int(self.val['n_rows']),int(self.val['n_cols']))
def to_string(self):
r = self.val['n_rows']
c = self.val['n_cols']
return ('ARMA Matrix[%d x %d]' % ( r,c ) )
class CubePrinter:
class _iterator(object):
def __init__ (self, start, r, c, s):
self.ptr = start
self.len = r*c*s
self.rows = r
self.cols = c
self.slices = s
self.cnt = 0
def __iter__(self):
return self
def __next__(self):
if self.cnt == self.len:
raise StopIteration
count = self.cnt
crt= self.ptr + count
elem = crt.dereference()
self.cnt = self.cnt + 1
cols = (count//self.rows) % self.cols
rows = count % self.rows
slices = (count//(self.rows*self.cols))
return ('[%d,%d,%d]' % (rows,cols,slices), elem)
def __init__(self, val):
self.val = val
def children(self):
return self._iterator(self.val['mem'], int(self.val['n_rows']),int(self.val['n_cols']),int(self.val['n_slices']))
def to_string(self):
r = self.val['n_rows']
c = self.val['n_cols']
s = self.val['n_slices']
return ('ARMA Cube[%d x %d x %d]' % ( r,c,s ) )
def lookup_type (val):
if str(val.type).find('arma::')>=0:
if str(val.type).find('vec')>0:
return VecPrinter(val)
if str(val.type).find('Col')>0 or str(val.type).find('Row')>0:
return VecPrinter(val)
if str(val.type).find('mat')>0 or str(val.type).find('Mat')>0:
return MatPrinter(val)
if str(val.type).find('cube')>0 or str(val.type).find('Cube')>0:
return CubePrinter(val)
return None
gdb.pretty_printers.append (lookup_type)
Another cool thing you can do with the python interface is to create your own gdb commands. A really useful feature is to add plot support from gdb terminal. All you have to do is to create a python function and source it into the gdb environment. You can either do this in the ~/.gdbinitfile or directly in the debug terminal e.g. > source /home/claes/GDB_python/gdb_plot.py
An example that adds some vector and image plot commands using MatplotLib (for type arma::mat, arma::vec and arma::ivec):
import gdb
import numpy
import matplotlib.pyplot as pl
from multiprocessing import Process
def GetData(arg):
"""
Parse command argument and return the data as an python array
"""
args = gdb.string_to_argv(arg)
v = gdb.parse_and_eval(args[0])
print("type= ",v.type)
if str(v.type).find("arma::vec")>=0 or str(v.type).find("arma::Col<double>")>=0:
w_sz = gdb.lookup_type('double').sizeof
np_type = numpy.double
elif str(v.type).find("arma::mat")>=0 or str(v.type).find("arma::Mat<double>")>=0:
w_sz = gdb.lookup_type('double').sizeof
np_type = numpy.double
elif str(v.type).find("arma::ivec")>=0 or str(v.type).find("arma::Col<long>")>=0:
w_sz = gdb.lookup_type('long').sizeof
np_type = numpy.long
else:
print("Unsupported input type!")
buf = v['mem'].cast(gdb.lookup_type('void').pointer())
width = int(v['n_cols'])
height = int(v['n_rows'])
print("Size= [",height,"x",width,"]")
nr_of_pix = int(width*height)
nr_of_bytes = int(nr_of_pix*w_sz)
inferior = gdb.selected_inferior()
mem = inferior.read_memory(buf, nr_of_bytes)
img = numpy.frombuffer(mem, count=nr_of_pix, dtype=np_type)
img = img.reshape((height,width),order="F")
return img
def VecPlot(vec):
pl.plot(vec)
pl.grid()
pl.show()
def ImPlot(img):
H,W = img.shape
pl.figure(figsize=(5*W/H,5))
pl.imshow(img,cmap = pl.cm.gray,interpolation="nearest")
pl.colorbar()
pl.show()
def ImDisp(img):
H,W = img.shape
for r in range(H):
gdb.write(str(img[r][:]))
gdb.write("\n")
class ImCmd(gdb.Command):
"""
Implements a image viewer in MatplotLib for a mat type.
Invoke using 'image <variable name>'
"""
def __init__(self):
super(ImCmd, self).__init__("image", gdb.COMMAND_DATA, gdb.COMPLETE_SYMBOL)
def invoke(self, arg, from_tty):
img = GetData(arg)
p = Process(target=ImPlot, args=(img,))
p.start()
ImCmd()
class PlotY(gdb.Command):
"""
Implements a image viewer in MatplotLib for the vec type.
Invoke using 'plot <variable name>'
"""
def __init__(self):
super(PlotY, self).__init__("plot", gdb.COMMAND_DATA, gdb.COMPLETE_SYMBOL)
def invoke(self, arg, from_tty):
img = GetData(arg)
p = Process(target=VecPlot, args=(img,))
p.start()
PlotY()
class DispCmd(gdb.Command):
"""
Implements a image/matrix printer for a mat type.
Invoke using 'imdisp <variable name>'
"""
def __init__(self):
super(DispCmd, self).__init__("imdisp", gdb.COMMAND_DATA, gdb.COMPLETE_SYMBOL)
def invoke(self, arg, from_tty):
img = GetData(arg)
ImDisp(img)
DispCmd()
To use it in your gdb terminal to plot the variables
arma::vec A(100,arma::fill:randu);
arma::mat B(640,480,arma::fill:randu);
use:


 1.8.13